Accepting payments via ERIP (Raschet system)
The ERIP (Raschet system) is a single settlement and information space developed by the National Bank of the Republic of Belarus to facilitate payments initiated by individuals and organizations.
Customers can make ERIP payments in cash, by e-money and bank cards in 13 000 points of banking services provided by 24 banks, as well as via the Internet and mobile banking.
bePaid provides an advanced integration with the ERIP (Raschet system) in the real-time mode which serves to immediate ERIP payment request generation and notification.
bePaid offers a special integration option ERIP External for merchants who have their own website and store all the information required for making ERIP payments and for issuing ERIP invoices in their system.
Types of ERIP payment requests
You can create different types of ERIP payment requests in the bePaid back office or via the bePaid API:
-
Single payment request is a payment request created to collect a single payment for an order or a bill. When just created, the payment request gets the
pendingstatus and becomes valid for a payment. After the request is successfully settled, it becomes invalid, and bePaid will return an error stating that the payment request can not be found. -
Permanent payment request is a payment request created to collect several payments for an order or a bill. When using permanent requests, there is no need to create a single payment request after each successful payment. You can create a permanent payment request only via the bePaid API. Refer to the
permanentrequest parameter. -
Advance payments is a method of accepting payments from customers without any payment requests created before a payment. The bePaid system automatically creates a payment request once it receives a payment notification from the ERIP (Raschet system).
Info
For advanced payments, the system can not check if the customer indicated a valid number of an order, a bill, or an agreement to make a payment. Besides, the system can not get information on any unpaid orders or bills. The customer can edit the payment amount. Thus, if you use this type of payment requests, make sure that you provide your customers with a clear and detailed instruction on how to make a payment.
Info
To get the option of advance payments enabled for you, please contact your Account Manager.
Statuses of ERIP payment requests
After the customer makes a payment, the payment request can get one of the following statuses:
| Status | Description |
|---|---|
successful |
A payment was successful. A payment amount will be credited to the merchant's account on the next business day. |
failed |
The bank who processed a payment transaction could not finalize it successfully, and a payment was declined. A ERIP payment request is still valid for another payment. |
expired |
Either the payment request expired, or there was created another payment request with the same number of an order, a bill or an agreement. The payment request of this status is not valid for payments. The expiry date of a payment request can be set either in the back office upon creating a payment request, or as a value of the expired_at parameter of an API request. |
deleted |
A payment request is deleted and is not valid for payments via the ERIP. |
Notifications about processed payments
After bePaid gets a notification about a processed ERIP payment, the bePaid system either creates a payment request or changes the status of the payment request to successful or failed.
If you set email or webhooks notifications, bePaid will send an email or a webhook notification with the details of the payment.
Create an ERIP payment request in the back office
To create a ERIP payment request in the bePaid back office, make the following steps:
- Sign in at https://merchant.bepaid.by.
- Go to the ERIP tab.
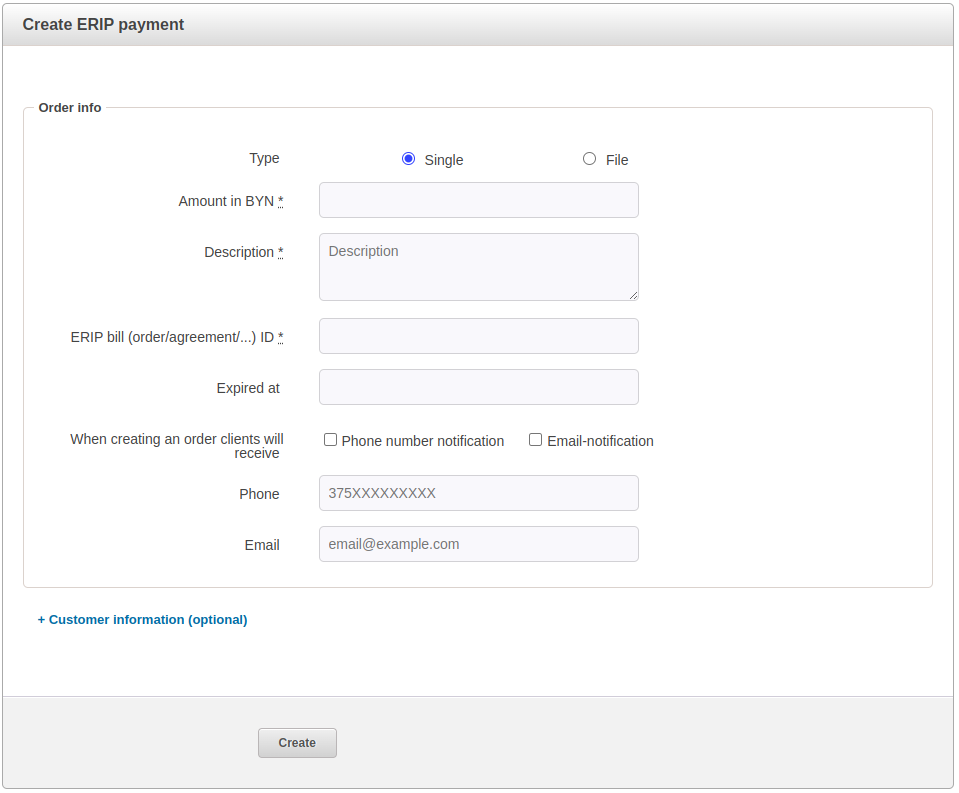
- Fill in the form according to the description in the table below. To add customer details, click + Customer information (optional).
- Click Create.
The system will create a single payment request and route it to the ERIP. Besides, bePaid will send out a notification to the customer if you selected this option.

| Parameter | Description | Notes |
|---|---|---|
| Type * required |
A payment request type. Possible values: Single — to create a single payment request; File — to create single payment requests by a file upload. |
|
| Amount in BYN * required |
An amount to pay by the customer for the product or service. | Separate digits with ..For a payment with an open amount, submit 0. |
| Description * required |
A description of the product or service. | |
| ERIP bill (order/agreement/...) ID * required |
Order or bill ID. | |
| Expired at | An expiration date of the payment request. | After the expiration date, the customer will not be able to pay the order. |
| When creating an order clients will receive | An option to notify customers of created payment requests. Possible values: Phone number notification — to notify customers by SMS;Email - to notify customers by email. |
|
| Phone * conditionally required |
The customer’s phone number. | Required, if the customers should be notified of created payment requests by SMS. It is recommended to submit the phone number as 12 digits without + and -. |
| Email * conditionally required |
The customer’s email. | Required, if the customers should be notified of created payment requests by email. |
| First name | The customer’s first name. | |
| Middle name | The customer’s middle name. | |
| Last name | The customer’s last name. | |
| City | The customer’s city. | |
| Address | The customer’s address. |
Download a file with account data for ERIP payment requests
Instead of creating ERIP payment requests as described above, you can download account data for ERIP payments requests.
For that, make the steps below:
- Prepare a file with payment request data according to the description below.
- Sign in at https://merchant.bepaid.by.
- Go the ERIP tab.
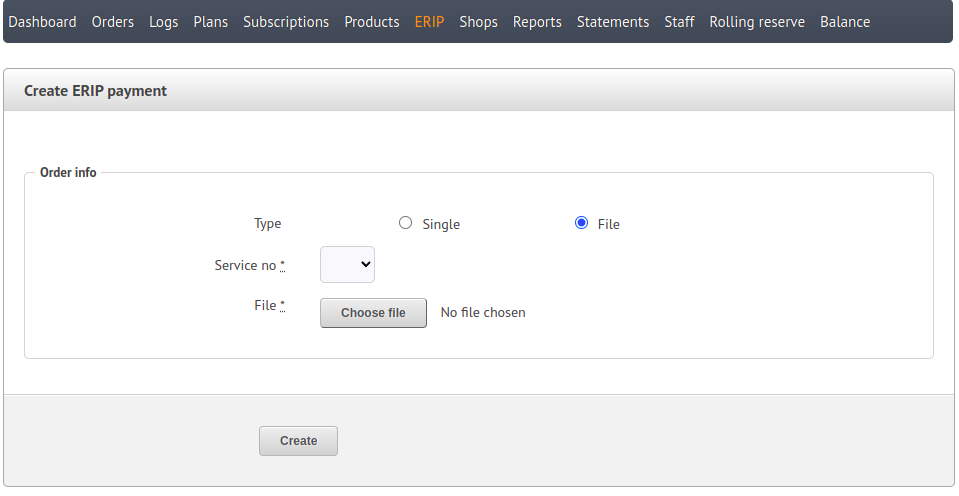
- For the Type parameter in the form, select File.
- Click Choose file to upload the prepared file.
- Click Create.
The system will create a single payment request and route it to the ERIP, as well as it will send out a notification to the customer if you selected this option.
If any row of the file contains an error, or bePaid failed to register a payment request in the ERIP, the system will display a row with an error and an error description.

To upload payment request data, you should prepare a file in .csv or .txt format, each row of which contains details of a single payment request.
You can upload files of two types:
- A file with payment request data;
- A file with counter readings (to upload counter readings and accept payments based on their data).
The format of a file with payment request data
A file with payment request data should have the following format:
bill ID|last name|first name|middle name|address|amount to pay|payment description|payment request type|number of counters|notifications|phone|email
| Parameter | Description | Notes |
|---|---|---|
| Bill ID | Order or bill number. | |
| First name | The customer’s first name. | |
| Middle name | The customer’s middle name. | |
| Last name | The customer’s last name. | |
| Address | The customer’s address. | |
| Amount to pay | An amount to pay by the customer for the product or service. | Separate digits with . or ,.For a payment with an open amount, submit 0. |
| Payment description | A description of the product or service. | |
| Payment request type | A payment request type. Possible values: 0 — to create a single payment request. Set by default, if the parameter is not submitted;1 — to create single payment requests by a file upload. The customer can pay the bill multiple times or pay in installments. |
|
| Number of counters | The number of counters. Set to 0 or an empty value, if counters are not applicable. |
|
| Notifications | Applicable types of notifications sent out to customers. Possible values: sms - to notify the customer of a created payment request by SMS;email - to notify the customer of a created payment request by email;empty value - no notifications will be sent out. Set by default. |
|
| Phone | The customer’s phone number. | Required, if the customers should be notified of created payment requests by SMS. Submit the phone number as 12 digits without + and -. |
| The customer’s email. | Required, if the customers should be notified of created payment requests by email. |
You may submit partial information, but make sure you keep all | in place.
Sample content of a file with details of 2 accounts
II123|Ivanov|Ivan||pr. Dzerzhinskogo, apt. 104, Minsk|25.00|Payment under Agreement #II123 |||sms|375291234567||
892|||||1,50|Payment for order #892||||||
The format of a file with counter readings
Besides a download of single payment requests, you can download a file with values of counters and accept payments of amounts calculated on the basis of these values.
A file with counter readings should have the following format:
bill ID|last name|first name|middle name|address|amount to pay|payment description|payment request type|number of counters|notifications|phone|email|name of counter 1|unit of counter 1|capacity of counter 1|current reading of counter 1|unit price of counter 1|name of counter 2|unit of counter 2|capacity of counter 2|current reading of counter 2|unit price of counter 2|...
Besides the parameters identical to the parameters of the file with payment request data, the file with counter readings should contain the additional fields, as described in the table below.
| Parameter | Description | Notes |
|---|---|---|
| Name | A name of the counter or the services measured with the counter. | |
| Unit | A measurement unit of the counter. | |
| Capacity | A capacity of the counter. | |
| Current reading | The current reading of the counter. | |
| Unit price | The service price set for the unit of the counter. |
Counter parameters should be submitted for every counter.
You may submit partial information, but make sure you keep all | in place.
Sample content of a file to collect a payment for water supply based on the values of 2 counters
С61|Agulina|Irina|Cheslavovna|Hlubokae city, Lenina street, 137-61||Water supply|1|2|sms|375291234567||Cold water|m3|4|123|0.8338|Hot water|m3|4|456|0.8338
Create a CSV file from an XLSX file
If you create payment requests in Excel, your table is supposed to look like this:

To convert the data from your XLSX table to a CSV file, make the steps below:
- If your XLS file has column names (as in the example above), delete the names.
- Save the file in CSV format. If you have any problems, refer to the following manual.
- Open the saved CSV file in a text editor and replace the field separators in the file with
|. - Save the file.